
The Raspberry pi, although a beautiful project and quite an electronic feat, it can be a bit limiting as a main production machine, but I convinced myself I could use it as my main traveling computer.
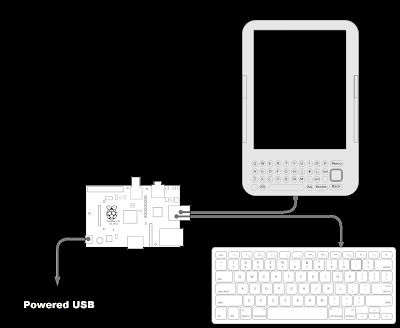
The plan was, using a Kindle as a screen, connecting it to the processing power of the Raspberry Pi while using an external keyboard to work comfortably. Since connecting an external keyboard to the Kindle seemed impossible at that point, I needed to use the Raspberry Pi as the ‘hub’. The tinkering started and the KindleBerry Pi was soon to be born.
Lets get started
What you will need to do this hack:
DISCLAIMER – you can brick (render unusable) your Kindle doing so, these are just pointers and I take no responsibility whatever you do with your kindle, or your life…
The first part, connecting the Kindle to the Raspberry Pi is simple enough. Jail break the Kindle , install a terminal emulator like this one and then install UsbNetwork. Make sure the usbNetwork is enable, Connect the devices trough USB, do a quick ifconfig usb0 192.168.2.1 and Voila, I can login into the Raspberry Pi with no problem, using the great display of the Kindle but sadly also using it’s limiting keyboard.
The main challenge now is to use the keyboard connected to the Rasberry Pi instead of the Kindle’s. This is where the magic of gnu screen comes in play! Screen is a terminal multiplexer, if you don’t know what a terminal is, well, I am not sure why you are reading this article in the first place, but let say ‘screen is a terminal on steroid’. One of the nice function of screen is that you can be multiple user on the same ‘screen’ session, for lets say you want to monitor what people do when they connect to your computer trough ssh, or if you want to… well… screencast in a terminal environment (whatever enjoyment that would give you). Anyhow, I am not sure why there is a multiuser mode, but it is that ability that make the KindleBerry Pi possible.
So what happen here, is that using the keyboard connected to the Raspberry Pi, you will login into the Raspberry pi with the Kindle and then share the same ‘screen’ session so that you can use the keyboard connected on the Raspberry Pi. You will still need to use the Kindle keyboard to create that first connection, but once your connected, you can use your mail keyboard.
Although gnu screen come and save the day, to automate the whole process there are few more steps to be done.
First we want to be able to use UsbNetworking when connecting Kindle. When the Kindle is on usbNetworking, it assign the ip 192.168.2.2 to its USB port. Whe then need the Raspberry Pi to assign its USB port the IP 192.168.2.1 and that has to be automatic. To do so, the first step is to add to your /etc/network/interfaces :
Now we need the Raspberry Pi to 1) make sure one user login automatically and 2) have a screen multiuser session started at boot time. We will be using the same user for the login at boot time and login with the Kindle.
For the automatic login on boot, on debian (which is one of the main build of the Raspberry Pi) you have to ;
(or using any other editor) and comment out:
and then add :
That should do the trick, now lets make sure screen start automatically, when the Raspberry Pi starts and whenever you login from the kindle.
We now have to make sure that the user which is automatically logged in will starts a screen session, but we also have to make sure that when you login with the Kindle, you don’t start another screen session but actually join the already started screen session. Mileage might vary depending on your system here, so experiment with the code, but most of it should be in the .bash_profile. There is probably many other ways to go about it (use the bashrc and bash_profile or have more than one user etc…) but this is one of the solution that I came up with.
Here is my .bash_profile:
So once it’s all in place, you should be able to fire up your KindleBerry Pi, once the boot sequence is done, you can connect the Kindle in UsbNetwork mode trough USB, moving into your shell and ssh into the Raspberry Pi. From there you should be able to use the keyboard connected in the Raspberry Pi, and see the result on the Kindle! For some reason sometime I have to fiddle with the screen session, killing the extra one and the connecting to the main one.
You probably can work some simple passwordless ssh with authentication key, to save some time and add some cute scripting to simplyfi the whole connection process, but once you are connected you can then start using the Raspberry Pi keyboard. There is actually a lot of improvement that could be done with this hack, so feel free to send your ideas!
It was really fun to create the KindleBerry Pi and I even started using that setup for few weeks. But I quickly realized that if I wanted to do anything productive at this point it was better to get myself a computer. My skill in command line and programming might have been too low to completely move to a shell only lifestyle. So sadly the KindleBerry Pi at this point is only a proof of concept and could probably be really neat in a ‘end of the world’ scenario! There still might be some minimal hardcore coder out there who would enjoy such a platform!
My next project, using some of the learning from this project, is to do some portable music platform with the Raspberry Pi, pureData and my minimpk! Stay tuned!
- a Kindle 3 ( 1 or two, if you end up breaking the first one)
- a Raspberry Pi
- 2 micro usb to usb cables (one for power and one to connect the Kindle to the Raspberry Pi)
- One keyboard connected to the Raspberry pi
- Optional are a kindle stand (you can use an old audio tape box)
- Optional again is a usb hub since the KindleBerry pi has both port in use when assembled
get your kit :
/|\

Hacking the Kindle
DISCLAIMER – you can brick (render unusable) your Kindle doing so, these are just pointers and I take no responsibility whatever you do with your kindle, or your life…The first part, connecting the Kindle to the Raspberry Pi is simple enough. Jail break the Kindle , install a terminal emulator like this one and then install UsbNetwork. Make sure the usbNetwork is enable, Connect the devices trough USB, do a quick ifconfig usb0 192.168.2.1 and Voila, I can login into the Raspberry Pi with no problem, using the great display of the Kindle but sadly also using it’s limiting keyboard.
The main challenge now is to use the keyboard connected to the Rasberry Pi instead of the Kindle’s. This is where the magic of gnu screen comes in play! Screen is a terminal multiplexer, if you don’t know what a terminal is, well, I am not sure why you are reading this article in the first place, but let say ‘screen is a terminal on steroid’. One of the nice function of screen is that you can be multiple user on the same ‘screen’ session, for lets say you want to monitor what people do when they connect to your computer trough ssh, or if you want to… well… screencast in a terminal environment (whatever enjoyment that would give you). Anyhow, I am not sure why there is a multiuser mode, but it is that ability that make the KindleBerry Pi possible.
So what happen here, is that using the keyboard connected to the Raspberry Pi, you will login into the Raspberry pi with the Kindle and then share the same ‘screen’ session so that you can use the keyboard connected on the Raspberry Pi. You will still need to use the Kindle keyboard to create that first connection, but once your connected, you can use your mail keyboard.
Although gnu screen come and save the day, to automate the whole process there are few more steps to be done.
Usb network for the Raspberry Pi
First we want to be able to use UsbNetworking when connecting Kindle. When the Kindle is on usbNetworking, it assign the ip 192.168.2.2 to its USB port. Whe then need the Raspberry Pi to assign its USB port the IP 192.168.2.1 and that has to be automatic. To do so, the first step is to add to your /etc/network/interfaces :
allow-hotplug usb0
mapping hotplug
script grep
map usb0
iface usb0 inet static
address 192.168.2.1
netmask 255.255.255.0
broadcast 192.168.2.255
up iptables -I INPUT 1 -s 192.168.2.1 -j ACCEPT
Automatic login on the Raspberry Pi
Now we need the Raspberry Pi to 1) make sure one user login automatically and 2) have a screen multiuser session started at boot time. We will be using the same user for the login at boot time and login with the Kindle.
For the automatic login on boot, on debian (which is one of the main build of the Raspberry Pi) you have to ;
vim /etc/inittab #1:234:respawn:/sbin/getty 3840 tty1
1:2345:respawn:/bin/login -f YOUR_USER_NAME tty1/dev/tty1 2< & 1
[/prettify]
<i> My code prettifyer adds some #038; code that you can omit </i>
<strong>EDIT: Some reader have mention that using this code instead work for them:</strong>
[prettify]1:2345:respawn/sbin/agetty -a YOUR_USER_NAME -8 -s 38500 tty1 linux That should do the trick, now lets make sure screen start automatically, when the Raspberry Pi starts and whenever you login from the kindle.
Bashrc
We now have to make sure that the user which is automatically logged in will starts a screen session, but we also have to make sure that when you login with the Kindle, you don’t start another screen session but actually join the already started screen session. Mileage might vary depending on your system here, so experiment with the code, but most of it should be in the .bash_profile. There is probably many other ways to go about it (use the bashrc and bash_profile or have more than one user etc…) but this is one of the solution that I came up with.
Here is my .bash_profile:
if [ -z “$&;STY” ];  then
    exec screen -xR
fi
So once it’s all in place, you should be able to fire up your KindleBerry Pi, once the boot sequence is done, you can connect the Kindle in UsbNetwork mode trough USB, moving into your shell and ssh into the Raspberry Pi. From there you should be able to use the keyboard connected in the Raspberry Pi, and see the result on the Kindle! For some reason sometime I have to fiddle with the screen session, killing the extra one and the connecting to the main one.
You probably can work some simple passwordless ssh with authentication key, to save some time and add some cute scripting to simplyfi the whole connection process, but once you are connected you can then start using the Raspberry Pi keyboard. There is actually a lot of improvement that could be done with this hack, so feel free to send your ideas!
It was really fun to create the KindleBerry Pi and I even started using that setup for few weeks. But I quickly realized that if I wanted to do anything productive at this point it was better to get myself a computer. My skill in command line and programming might have been too low to completely move to a shell only lifestyle. So sadly the KindleBerry Pi at this point is only a proof of concept and could probably be really neat in a ‘end of the world’ scenario! There still might be some minimal hardcore coder out there who would enjoy such a platform!
My next project, using some of the learning from this project, is to do some portable music platform with the Raspberry Pi, pureData and my minimpk! Stay tuned!
source : https://goo.gl/v1C6YK
Comments
Post a Comment