
- Transcoding: Transcode media to portable devices
- Meta data: Automatically scrape movies, music, and TV series meta data
- Music: Play music on all devices from a shared library
- Storage: Store and backup media files with RAID capability
- Streaming: Stream media to HTPC using SMB and other protocols
- Reliability: Provide peace of mind with minimal amount of maintenance
- Energy efficiency: Consume as little power as possible
- Price: Reasonably priced
Choose Media Server Hardware
Either your current or spare PC :
When building your own media server, it is good to keep these basic recommendations in mind:
3 GHz dual-core processor (2.4 GHz is a minimum for 1080p transcoding)
4 GB RAM (minimum 2 GB)
3 TB hard drives
Gigabit Ethernet recommended for HD streaming
or
On a smaller pc - the Intel NUC [Celeron Processor]
get the set here :
get the set here :
/|\
Set Up Windows Storage Spaces
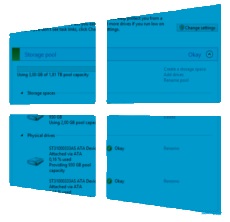
You may be surprised to learn that Windows allows you to organize hard disks into storage pools, which use RAID-style mirroring and parity techniques to keep your media files safe.
This new capability is called Storage Spaces that is included by default in Windows.
I was positively surprised how easy it was to set up storage spaces. In fact, after installing 2 x 1TB spare hard drives to the media server case, it took me only a couple of minutes to configure the system.
Configure storage spaces
In this section, you will learn in practice the steps you need to take to keep your data safe with Windows storage spaces.
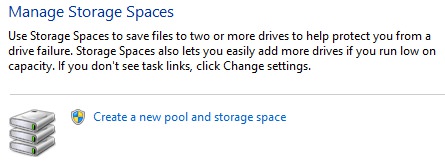
First, go to Control Panel and select administration options under System and Security. Select the “create a new pool and storage space” option, and you will be prompted to create your first storage space.
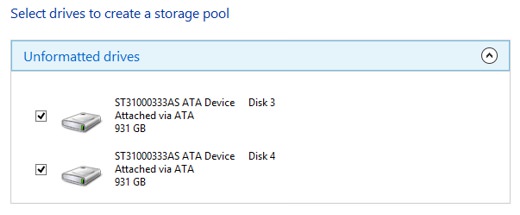
You will see a list of available hard drives that can be incorporated into your pool. In order to be able to utilize RAID-style resiliency features, you should use at least two hard drives.
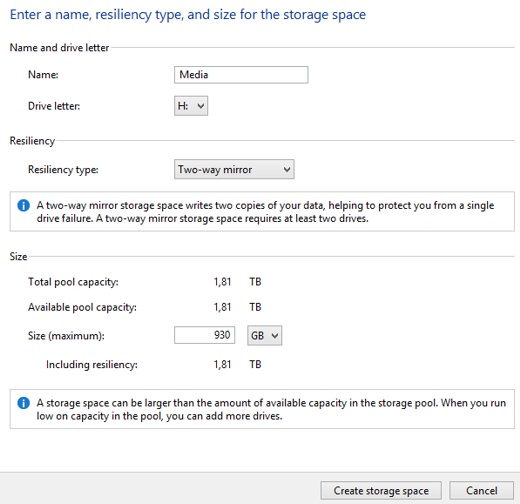
Next, enter a name, drive letter, and resiliency type for your storage space. I decided to use two-way mirroring resiliency type to protect my data from a single drive failure.
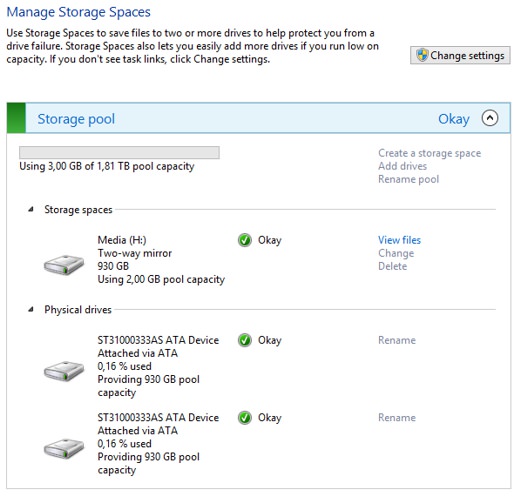
Finally, click “Create storage space”, and your storage pool will be created. Now, set up is completed and you can start copying media files to the storage space.
Set Up Plex Media Server
Plex Media Server is a back-end application that you have running all the time at home on various platforms such as Windows, Mac OSX and Linux. The Plex Media Center is actually a fork of the open-source project, XBMC, but particularly the Plex Media Server is closed-code and actively developed by the Plex team.
In addition to it’s own front-end software, Plex Media Center, the back-end server application is compatible with many other front-ends such as XBMC (with Plexbmc add-on). There are also mobile front-end apps available on iOS, Android and Windows Phone operating system.
Plex consist of three main components:
Media Server that runs on your Windows, Mac OSX, or Linux computer
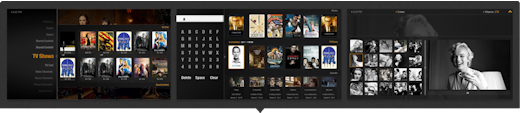
Media Manager that points Media Server to media folders and automatically scrapes the meta data and organizes them into a beautiful media library
Plex clients that provides a simple front-end user interface to access media
The most interesting feature of Plex Media Server is the ability to transcode your videos depending on your device and network. In practice, this means that it will dynamically squish videos so that they still play smoothly on your mobile phone or your iPad over wireless network.
Another great feature of the Plex is that you can continue the video file from where you left off on any device.
Setting up the Plex Media Server is easy. Simply follow these steps, and you will have it set up in less than an hour. These instructions are for Windows, but you can also find instructions to set up Plex Media Server on unRAID Linux OS.
Install and Configure Plex Media Server
Download the Plex Media Server here.
Install the server application on your computer
Open the Plex Media Server by right clicking the application icon on your start bar and selecting “Media Manager”
In order to create a new folder, click “Add a section” under “My Library”, and select the folder where the media files are located
Repeat step four to link all your media folders into Plex Media Server
Allow the PMS to go through your media files and scrape the meta data
Now you are ready to add some online content.
Configure myPlex Service
MyPlex is a free service that allows you to watch your media over the Internet, share it with friends, or bookmark interesting videos for later viewing. First, go to plex.tv, and setup your free account.
While setting up myPlex service is easy, many people are facing technical issues when attempting to get the connection working over the Internet. A common error message with myPlex is, “myPlex was unable to connect to your server”.

Usually, this connection problem relates to the firewall port forwarding issues. You will need to allow the TCP 32400 port through your router’s firewall to enable access for the Plex Media Server. The specific steps to allow port forwarding depends on your router model, so you should check the instructions from portforward.com.
I was not able to get the myPlex service working even after configuring the port forwarding properly. In my particular case, the issue was my router’s firewall settings. After disabling the active firewall in the routers security settings, I was able to get the myPlex working.
Add Channels
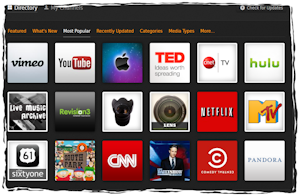 You can find and install approved channels by going to the “Channel Directory” section.
There are Hulu and Netflix channels available as well. Unfortunately, on Plex, you can forget Hulu and Netflix channels as they do not work (at least according to my experience).
Fortunately, there is an easy way to get Hulu, Netflix and other premium content channels working with PlayOn Media Server.
That’s it; you have completed setting up your own media server.
Set Up Plex Clients

Now, you are ready to set up one of the Plex Clients, such as Plex Home Theater (they have rebranded the Plex Media Center desktop app), PleXBMC add-on for XBMC, Plex app for iOS, Plex app for Windows, or other Plex compatible devices. You can also simply use the Plex Web Browser to access and play media files.
However, the most comprehensive Plex client is the Plex Home Theater (a.k.a Media Center) software that is available on Windows, Mac OS X, Apple TV2, and Raspberry Pi. Just download the front-end application here, install it, and you are ready to enjoy your media with Plex.
By the way, if you want to make your Plex client look even cooler, you should download a custom skin called PlexAeon, which is a port from the popular Aeon skin on XBMC.
Download the latest version of the PlexAeon skin here.
Unzip the PlexAeon-master.zip, and copy the content of the PlexAeon-master folder into Program FilesPlexPlex Media Centeraddonsskin.plexaeon (you will need to create the skin.plexaeon folder yourself).
Launch Plex Home Theater (a.k.a Media Center), and go to Preferences > Appearance > Skin > PlexAeon to select the custom skin.
Summary
In this article, you have learned how to set up Plex Media Server with Windows 8 Storage Spaces in order to build a media server box to rule them all.
Plex’s strengths are in finding all of your movie and music metadata without any problem, while the channel app store is simple and easy to use. Plex really shines when you need to have your media collection available and in sync in multiple rooms with TVs, and you want to access media files with your table or Roku type media streaming devices.
If your main consideration is to stream online content channels instead of local media files, then you should consider trying PlayOn Media Serverinstead of Plex, as it is much more capable to stream premium content channels.
On the other hand, if you have only one room and will be using a HTPC, then Kodi Media Center should be your main consideration.
source : https://goo.gl/aVvdg3
Comments
Post a Comment