
As you’d expect, you’ll need a Raspberry Pi alongside a handful of parts:

- Raspberry Pi 3 (recommended), Raspberry Pi Zero W, with Raspbian installed and Wi-Fi set up. If you haven’t installed Raspbian before, this guide covers everything you need to know. While I’m going to concentrate on installing this on the Raspberry Pi, a number of other devices are supported. You can find a whole list here.
- A MicroUSB power cable.
- An 8GB MicroSD card.
- A USB Microphone, If you’re using the Raspberry Pi Zero W you’ll also need a MicroUSB-USB adapter.
- Speakers any powered speaker does the job.
- A Keyboard and Mouse for setup (or use SSH, makes this project much easier to do from your main computer because you can copy/paste the longer commands).
Get your kit here :
Step One: Register for a Free Amazon Developer Account
- 1. Log into your Amazon Developer Account.
- 2. Click on the Alexa Tab.
- 3. Click Register a Product Type > Device.
- 4. Name your device type and display name (I arbitrarily chose “Pi2” for both, though you can enter pretty much whatever you want here), then click Next.
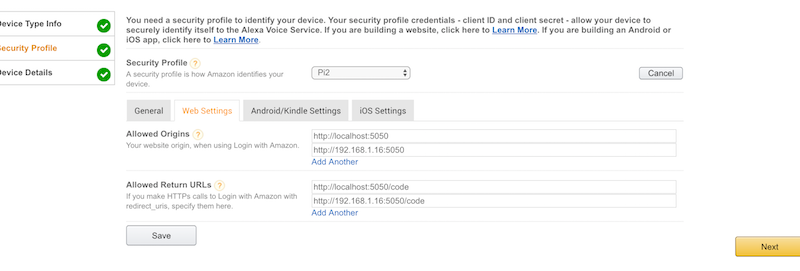
- 5. On the Security Profile screen, click “Create new profile.”
- 6. Under the General tab, next to “Security Profile Name” name your profile. Do the same for the description. Click Next.
- 7. Make a note of the Product ID, Client ID, and Client Secret that the site generates for you.
- 8. Click the Web Settings tab, then click the Edit button next to the profile dropdown.
- 9. Next to Allowed Origins, click, “Add Another” and type in:
Before you do anything, you’ll need to register for a free Amazon Developer Account, then create a profile for your DIY Echo. If you’ve already done this because you made the previous version of the DIY Echo, note that sections 10-13 are slightly different, so you’ll want to change those details. Otherwise, this is pretty straightforward even though it takes a lot of clicks:
http://localhost:5050
- 10. Click “Add Another,” then type in [but replace with your.raspberrypi.ip.address ]
http://your.raspberrypi.ip.address:5050
- run 'ifconfig' to get the ipaddress
- 11. Next to Allowed Return URLs, click “Add Another” and type in:
http://localhost:5050/code
- 12. Click “Add Another” and add in
http://your.raspberrypi.ip.address:5050/code
- once again replacing your.raspberrypi.ip.address with your own info. Click Next when you’re done.
- 13. The Device Details tab is next. It doesn’t matter much what you enter here. Pick a category, write a description, pick an expected timeline, and enter a 0 on the form next to how many devices you plan on using this on. Click Next.
- 14. Finally, you can choose to add in Amazon Music here. This does not work on the Pi powered device, so leave it checked as “No.” Click Save.
Now you have an Amazon Developer Account and you’ve created a profile for your Pi-powered Echo. It’s time to head over to the Raspberry Pi and get Alexa working.
Step Two: Install Git and AlexaPi


Next up, you’ll need to fire up Terminal on your Raspberry Pi because we’re going to do the entirety of this project in the command line. Before you start the installation you need to update and install a couple things:
1. Update the Raspbian version
sudo apt-get install update
2. Install Git
sudo apt-get install git
3. Change Directory
cd /opt
4. Clone the AlexaPi Github repository.
sudo git clone https://github.com/alexa-pi/AlexaPi.git
That’s it for the downloading portion, onward to actually installing it.
Step Three: Run the AlexaPi Installation Script

Next, you’ll run an installation script. This automates the installation of everything else you need to get your Echo up and running.
1. Run the script
sudo ./AlexaPi/src/scripts/setup.sh
2. You’ll be asked a series of questions. If you’re using the Raspberry Pi, just press Enter for both the operating system and device prompts. The last question asks if you want to add AirPlay support. If you have an iOS device, this makes it so you can easily stream music from your iPhone to your DIY Echo over Airplay. The script will then download a bunch of software for the next 5-10 minutes, so go ahead and relax for a bit.
3. Eventually, you’ll be asked to enter in your Amazon developer information. Type in the Device Type ID and Security Profile Description you made way back in step one (we used AlexaPi). Next, you’ll need to enter in all those long, complicated numbers for your Profile ID, Client ID, Client Secret.
Finally, the last thing you need to do is authorize your device. You only need to do this once. Head back to your main computer and open up a web browser. Than type in
http://your.raspberrypi.ip.address:5050
replacing your.raspberryi.ip.address with your Raspberry Pi’s IP address from earlier. You’ll then need to log into your Amazon account. After that, you’ll see an authorization token.
4. That’s it, the Alexa voice service is now installed on your Raspberry Pi. You just need to start the service. You can either just reboot your device completely, or type in
4. That’s it, the Alexa voice service is now installed on your Raspberry Pi. You just need to start the service. You can either just reboot your device completely, or type in
sudo systemctl start AlexaPi.service
Go ahead and try it, say “Alexa” into the mic, and it should reply back with a “Yes?” If it’s not working, you can type in
sudo systemctl status AlexaPi.service
and press Enter to check the status. Alexa will start up automatically when you reboot your device or if the power goes out for some reason, so you shouldn’t ever have to think about it again.
________________________________________________________________________________
Thanks for reading, make sure to keep an eye on OkInteresting.com for more posts.
You can ask me questions here or @sanmansp on Twitter or fb.com/okinteresting
You can ask me questions here or @sanmansp on Twitter or fb.com/okinteresting
Comments
Post a Comment