
Want to play Minecraft on your own terms? Set up your own server, create your own worlds, perhaps build in them with friends and family?
It’s remarkable, but true: you can do all of this on a Raspberry Pi.
We are big fans of Minecraft, and always wanted to play along with friends. It’s not easy to do while we're playing on the computer.
The solution was simple: set up a Minecraft server on the Raspberry Pi. Within the hour, we were playing Minecraft together on our dedicated, Raspberry Pi powered server!
Forget spending money on a dedicated PC, it can be done with a compact, credit card-sized Linux computer. The Pi is the perfect solution, and the setup is easy to work through.
What You Will Need
To build a Minecraft server on your Raspberry Pi, you will need:
1. A Raspberry Pi 2 (or later) and power cable. We’re assuming your Pi is in a case.
2. Ethernet cable (preferable to wireless networking).
3. 8GB or larger microSD card.
Get your kit here :
/|\
All of the above, when used with a remote SSH connection will let you set up your Pi as a Minecraft server. If SSH isn’t an option, you will also need:
USB keyboard
USB mouse (or a combination of both)
1 x HDMI cable
A monitor or other compatible display
Connect these peripherals before powering on your Raspberry Pi.
You will also, of course, need a copy of Minecraft on your computer.
What Sort of Minecrafter Is This For?
Several versions of Minecraft are available. Not all of them are suitable for use with any type of user-managed Minecraft server.
Creating this server will give you a world that you can access from your Windows PC, or game console version of Minecraft. The low spec of the Raspberry Pi means that you won’t be able to host too many people (certainly no more than 10), for example. So if you have several computers within your local network, these could all be used to access the Minecraft environment running on the Raspberry Pi.
For Minecraft users with mobile devices, you’re probably using the Minecraft Pocket Edition (PE). Unfortunately, this version of Minecraft cannot access the Minecraft server you’re about to create on your Raspberry Pi. The same applies to other Raspberry Pis. Mincraft Pi Edition is based on Minecraft PE, so there is pretty much zero wiggle room there.
In short, you’ll need the main Minecraft open world game from Mojang.
1. Configured Raspbian
Configure the Raspbian environment for running the Minecraft server. Did you set it up with a monitor and keyboard? If so, simply open the Raspberry Pi Configuration tool in the Preferences menu on the desktop.
If you’re accessing via SSH, use sudo raspi-config to open the text-based configuration tool.
Here, make the following changes:

Go to Advanced Options > Memory Split and change the setting to 16MB. This will free more memory resources for the server. Next, find Overclock on the main menu and set this to High. (Raspberry Pi 3 users can skip this step.) Finally, go to Advanced > Expand Filesystem.
With these changes made, go to Finish and reboot Raspbian at the prompt. Once done, login again, and find the IP address of the device with:
Or:
- sudo hostname -I
- ifconfig
Make a note of the IP address before continuing.
2. Install the Minecraft Server
The next stage is to install the server into a dedicated directory. Make a directory called “minecraft” and use the change directory command to open it:
- sudo mkdir /home/minecraft cd /home/minecraft

- sudo wget https://hub.spigotmc.org/jenkins/job/BuildTools/lastSuccessfulBuild/artifact/target/BuildTools.jar
- sudo java -jar BuildTools.jar
Go fix yourself a drink while this stage completes.
3. Build the Minecraft Server
By the time you’ve made a drink and finished it, the Minecraft server should have been built. It’s time to launch the server. First, use the ls command to find the correct name of the latest spigot.jar file.
- ls
This should display a filename similar to spigot-[version].jar. At the time of writing, this was spigot-1.12.2.jar. Launch the server with the following command, making sure you enter the correct version number.
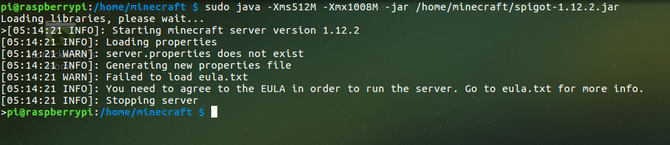
- sudo java -Xms512M -Xmx1008M -jar /home/minecraft/spigot-[version].jar nogui
- sudo nano eula.txt
- sudo java -Xms512M -Xmx1008M -jar /home/minecraft/spigot-[version].jar nogui
This time, things will take a bit longer as the map is built. We’re talking 3-5 minutes or so, but this is a one-time only delay. Once the map is created, subsequent restarts will only take half a minute or so.
4. Connect to the Raspberry Pi Minecraft Server
Your Minecraft server should now be online on your local network. Check this using a ping command from another device. If the ping returns results from your Raspberry Pi (you already made a note of the server IP) then you’re fine to continue.
All you need to do is launch Minecraft on your computer, then click Play > Servers. Here, Add Server, inputting the new server details, giving it a name, and adding the IP address. The port number should match the one listed in the server properties (see below). If not, change it!
Your server should then be listed as an option to connect to. Simply select the server to start playing.
5. Configure Your Minecraft Server
Once you know the server is setup correctly and on your network, it’s time to configure it. Begin by editing the server properties. This is a text file that can be accessed with the nano text editor:
- sudo nano /home/minecraft/server.properties
Various changes are recommended. Whatever you change here, keep in mind that the Pi is a modest device that cannot handle too much processing.
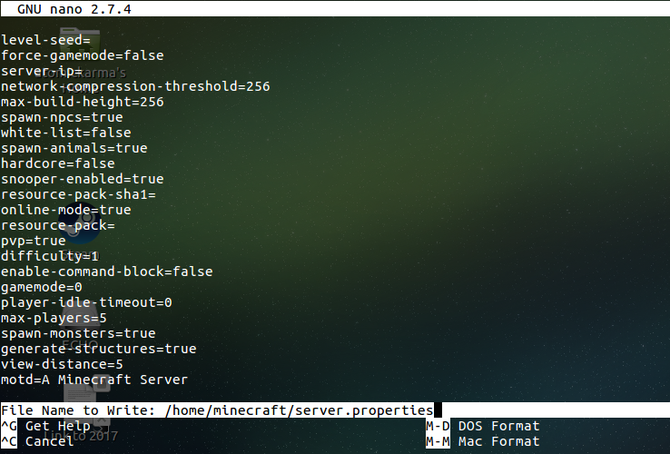
A list of server properties can be found in the Minecraft wiki, but those you should edit straight away are:
- view-distance=5 max-players=4
- pvp = true
- difficulty = [integer 0-3]
Here, the easiest setting is 0.
Finally, you should install the NoSpawnChunks plugin, which is designed to prevent too much RAM being eaten up by the Minecraft server. First, open the /plugins subdirectory:
- cd /home/minecraft/plugins
- sudo wget -O NoSpawnChunks.jar http://ci.dmulloy2.net/job/NoSpawnChunks/
This will keep RAM use low, thereby ensuring the server doesn’t run slow.
6. Make Minecraft Server Launch at Boot
If you’re using the Pi as a dedicated Minecraft server, it’s probably a good idea to have the server running at all times. While there’s bound to be some minor downtime, a startup script will ensure the server can start itself automatically.
Start by creating a startup script:
- sudo nano /home/startminecraft.sh
You can call it whatever you like — choose something meaningful though.
Copy the following into your startminecraft.sh file:
- #!/bin/bash cd /home/minecraft sudo java -Xms512M -Xmx1008M -jar /home/minecraft/spigot-[version].jar nogui &

- sudo chmod +x startminecraft.sh
- ./startminecraft.sh
- sudo nano /etc/rc.local
- bash /home/minecraft-start.sh
Again, use Ctrl > X to exit and save the file.
Minecraft Server Running on Your Raspberry Pi!
That’s all there is to it. Your very own Minecraft game server running on the Raspberry Pi. If you leave it up and running, you’ll have an always-on Minecraft world that you can connect to and use. A great solution for Minecraft-loving children, self-hosting the server on your local network keeps their online activity safe — at least as far as playing their favorite game goes.
If your Minecraft constructions are constantly being raided by children or other family members, then take a look at these Minecraft home security tips, which will surely help you to level the playing field!
________________________________________________________________________________
Thanks for reading, make sure to keep an eye on OkInteresting.com for more posts.
You can ask me questions here or @sanmansp on Twitter or fb.com/okinteresting
You can ask me questions here or @sanmansp on Twitter or fb.com/okinteresting
Nice article, which you have described very well about the game server. Your article is very useful for those who are looking to Best Private Game Server Setup. thanks for sharing.
ReplyDeleteMinecraft premium mu arıyorsunuz? Tıklayın: minecraft premium hesap
ReplyDelete