
/|\
First lets get some software. For now we need a few pieces of software. This includes the operating system (Linux Debian, or rather Raspbian). Raspbian can be downloaded at the Raspberry Pi website under the section Downloads, or you can just download their latest version here: https://downloads.raspberrypi.org/raspbian_lite_latest
When you have successfully downloaded Raspbian you have to write it to the SD card. My personal favorite program for this is a program called Win32 Disk imager. This can be downloaded at https://sourceforge.net/projects/win32diskimager/
After getting these two pieces of software we are ready to start doing something! Install the Win32 Disk Imager on your computer and fire it up. The program will ask you for a file image. This will be the (extracted) ISO file from the Raspberry Pi website. Next up you need to select the device. Make sure this is correct!
After you have written the OS on your SD card you can load it up in your Pi. Put the SD card in the SD slot, connect your Pi to internet (ethernet connection at first untill you have configured a wireless connection), connect an HDMI cable from a monitor, TV or any video source to your Pi so you can see what's happening.
When everything is connected, including the power, it should boot. Eventually it will ask you to log in, which is great!
You have come very far already! Only a few more steps untill you have a working Instagram bot!
Setting up the software
You have come very far already! Only a few more steps untill you have a working Instagram bot!
When the Raspberry is prompting for a login insert "pi" as login and when it's prompting for a password insert "raspberry". You should now be logged in.
Requirements for the python bot:
- Python itself with the requirements (PIP and sorts).
- The bot script itself
- Screen to run programs in the background
For those who are not familiar with Linux: I will try to guide you through by commands to the best of my capabilities, if you are getting stuck somewhere feel free to ask me.
- The bot script itself
- Screen to run programs in the background
For those who are not familiar with Linux: I will try to guide you through by commands to the best of my capabilities, if you are getting stuck somewhere feel free to ask me.
After logging in you first need a directory to store all data:
Then we navigate to this new directory:
Then we must get the package (Instabot). This can be downloaded here: https://github.com/instabot-py/instabot.py and transferred by FTP. I will not cover this here so I will explain how to get it with GIT.
Install GIT by writing:
Grab the project by writing
Now that we have the bot files on your Pi we have to install them. For that we need Python and PIP.
When the raspberry is done installing you can navigate to the Instabot folder. Here we should be able to find the requirements.txt file. To make sure it's the right location write
After confirming this is the right location lets install the packages:
sudo pip install requirements
There we go! Great, now all required files should work!
In the Instabot folder (/pi/bot/instabot.py) there is an example file called example.py. Open this file by writing the following command:
In case you don't have the nano package installed write
After opening up the example.py file we will start writing down our information. At line 16 and 17 are you login credentials used at Instagram. Every line should speak for itself and you should play around with it and tweak it to your liking.
Currently I have 1000 likes per day, but this can be changed to anything you see fit. I believe that Instagram allows 50 likes per hour when you start, and when you have aged your account a bit even 200. This means you can start out with 1200 per day to 4800 daily (not my advice).
Upon filling out the example file you can rename it to keep things cleared up what you are dealing with. To do this you can write the following:
That's about it, you should be able to launch your bot now!
Start the script without screen:
Code:
sudo mkdir bot
Code:
cd bot
Install GIT by writing:
Code:
sudo apt-get install git
Code:
sudo git clone https://github.com/instabot-py/instabot.py
Code:
sudo apt-get update
sudo apt-get install python python-pip
Code:
ls
sudo pip install requirements
There we go! Great, now all required files should work!
Configuring the bot
At this point we only need to configure the bot. Here is where you tweak around with the settings, but I will show you how to do some basics.In the Instabot folder (/pi/bot/instabot.py) there is an example file called example.py. Open this file by writing the following command:
Code:
sudo nano example.py
Code:
sudo apt-get install nano
Currently I have 1000 likes per day, but this can be changed to anything you see fit. I believe that Instagram allows 50 likes per hour when you start, and when you have aged your account a bit even 200. This means you can start out with 1200 per day to 4800 daily (not my advice).
Upon filling out the example file you can rename it to keep things cleared up what you are dealing with. To do this you can write the following:
Code:
sudo mv example.py followbot.py
Starting to bot
There are two ways to start your bot. One is just by default leaving open the window where you can read what the bot is doing, however it's not my advice. I would advice to use an application called screen. With screen you can assign a program to a "screen" which is basically a command prompt tab in Windows.Start the script without screen:
Code:
python /home/pi/bot/instabot.py/followbot.py (if the permissions are denied add "sudo" before the python command)
Start the script WITH screen:-
First download screen:
upon completion hit the following command:
This will make a screen for you. If you wish to open this screen up simply write the following:
It will show you something like 1000.followbot (date it started) (Detached). the number is important which you have to add behind the screen -r part, so it will be:
This will open up the screen application. If you are done with watching the screen you can close it again by pressing CTRL + A and right after that CTRL + D. There are plenty of tutorials about screen on the net, so if you need more information about that you can look that up!
What the run screen looks like -
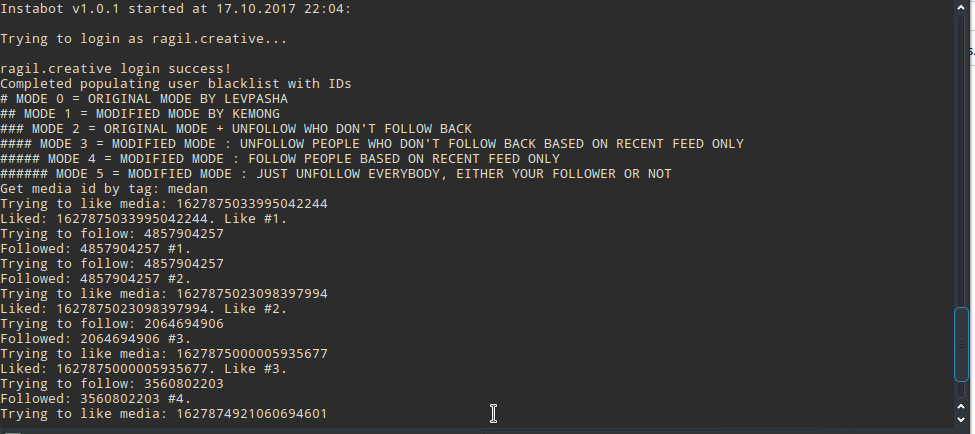
You can run this bot multiple times with multiple instances. To keep things easy for me I write a new python file for each Instagram bot that I use.
upon completion hit the following command:
This will make a screen for you. If you wish to open this screen up simply write the following:
It will show you something like 1000.followbot (date it started) (Detached). the number is important which you have to add behind the screen -r part, so it will be:
This will open up the screen application. If you are done with watching the screen you can close it again by pressing CTRL + A and right after that CTRL + D. There are plenty of tutorials about screen on the net, so if you need more information about that you can look that up!
What the run screen looks like -
You can run this bot multiple times with multiple instances. To keep things easy for me I write a new python file for each Instagram bot that I use.
________________________________________________________________________________
Thanks for reading, make sure to keep an eye on OkInteresting.com for more posts.
You can ask me questions here or @sanmansp on Twitter or fb.com/okinteresting
You can ask me questions here or @sanmansp on Twitter or fb.com/okinteresting
Could not install packages due to an EnvironmentError: 404 Client Error: Not Found for url: https://pypi.org/simple/requirements/
ReplyDeleteIt appears when I do sudo pip install requirements
same
Delete