
Overview
The Digital Free Library is a fun project that will allow you to create your own electronic library to share with others. Similiar to a Little Free Library but digital.I decided to create this project so I could share my favorite digital magazines and projects with my neighborhood. Hopefully this will get others interested in electronics by showing them stuff they might not have know about.
We will be using a Raspberry Pi Zero W so that others can connect to and browse the digital books offered.

Parts Needed
- Raspberry Pi Zero - Version does not matter
- SD card - We will be using Jessie Lite so anything 4gb or greater will work.
- Tiny OTG Adapter
- Raspberry Pi Zero Case - Optional
- USB Cable A/MicroB
Get your kit :
/|\
We will be using Raspbian Jessie Lite, the version I use is September 2016. To find older releases we can go to http://downloads.raspberrypi.org/
You may also want to try a more recent version if that's available and 9/28/2016 isn't working

Scroll down to the “ssh” option, it might be under Interfaces or Advanced (they move it around)

Hit the Enter key and then select “Enable”

A script will run and then you will see the following as confirmation:

You will need to reboot your Pi to make the change permanent
If you use windows, then you will need to download a free program called “PuTTY” from here: http://www.putty.org/.
Having downloaded and installed PuTTY (it's a single file called putty.exe), run the program.

Enter the IP address that you found earlier and click “Open”. This will give you a warning (the first time) and then prompt you for the user (“pi”) and password (“raspberry”).

The ssh window will then be ready for use.

For a good example of how to use ssh to remotely configure a raspberry Pi, take a look at this tutorial:
http://learn.adafruit.com/raspberry-pi-e-mail-notifier-using-leds/overview
Try exploring your files system by using 'ls' to list the files in the current directory and 'cd' followed by a directory name to change the current directory.
You can edit files using 'nano' followed by the file name and also install software using the 'apt-get' command, as described in some of the earlier tutorials in this series.
When finished with your ssh session, close the client application/window or simply type in exit into the shell window.
Currently the Hostname is at the default of raspberrypi, we want something more suited for this project. I will be using library, you could use any name you want or keep it at the default.
To change the hostname we will type
Preparation
-Prepare Micro SD Card
We will be using Raspbian Jessie Lite, the version I use is September 2016. To find older releases we can go to http://downloads.raspberrypi.org/
You may also want to try a more recent version if that's available and 9/28/2016 isn't working
Download Raspbian Jessie Lite
-Enabling SSH
In order to do this, open LX Terminal on your Pi and enter the following command to start Raspi Config:sudo raspi-config
Scroll down to the “ssh” option, it might be under Interfaces or Advanced (they move it around)
Hit the Enter key and then select “Enable”
A script will run and then you will see the following as confirmation:
You will need to reboot your Pi to make the change permanent
-SSH under Windows
If you use windows, then you will need to download a free program called “PuTTY” from here: http://www.putty.org/.
Having downloaded and installed PuTTY (it's a single file called putty.exe), run the program.
Enter the IP address that you found earlier and click “Open”. This will give you a warning (the first time) and then prompt you for the user (“pi”) and password (“raspberry”).
The ssh window will then be ready for use.
For a good example of how to use ssh to remotely configure a raspberry Pi, take a look at this tutorial:
http://learn.adafruit.com/raspberry-pi-e-mail-notifier-using-leds/overview
-Test & Configure
Try exploring your files system by using 'ls' to list the files in the current directory and 'cd' followed by a directory name to change the current directory.
You can edit files using 'nano' followed by the file name and also install software using the 'apt-get' command, as described in some of the earlier tutorials in this series.
When finished with your ssh session, close the client application/window or simply type in exit into the shell window.
-Change Hostname
Currently the Hostname is at the default of raspberrypi, we want something more suited for this project. I will be using library, you could use any name you want or keep it at the default.To change the hostname we will type
sudo raspi-config
Then select Advanced Options

Then select Hostname

Now you can enter in the Hostname you want to use.

Once you exit the config it will ask if you would like to reboot. Select yes.
When you connect using SSH you will need to enter the new hostname library.local
Now we can connect to the Raspberry Pi using SSH. The hostname we will be connecting to is raspberrypi.local

Now is also a good time to change the default password to something more secure. Enter passwd and follow the prompts.

Before moving to the next step we need to make sure we can connect to the internet. We will ping google.com
ping -c 5 google.com
-Install Apache
We will be using Apache for the Web Server. These install instructions were taken from the Raspberry Pi Foundation website. Their guide can be found at www.raspberrypi.org/documentation/remote-access/web-server/apache.md
We will start with installing apache using the following command in terminal. This will take about 5 minutes to install.
sudo apt-get install apache2 -y

Next we will navigate to where this was just installed.
cd /var/www/

Currently we do not have permissions to the folder html. We will need permissions so we can change the index page and add our files. To do this we will enter this in.
sudo chown pi: html

To test that Apache installed correctly we will open a web browser and go to
http://raspberrypi.local/

We now want to leave this folder and go back to the main directory. We will have issues later in the guide if we stay in /var/www, to exit just enter
cd
-Setting up the Webpage
I have made a simple website that can be uploaded to the Raspberry Pi and show the media to download - digitallibrary.zip
Once you have the file downloaded you can open the index.html file in a word editing program such as WordPad and edit the links for the images and files if you want to add or remove books.
Each book has this piece of code in the file - Download file
<div class="responsive">
  <div class="img">
  <a target="_top" href="issues/coloringbook_1-23-2014.pdf">
    <img src="images/rforrobot.jpg" >
  </a>
  <div class="desc"><p>Ladyada's R is for Robotics is a coloring book adventure with robots, their inventors and more.</p>
<p>Makers of all ages can learn, color and share their favorite robots and roboticists.</p>
<a href="https://www.adafruit.com/products/1936" target="_blank">https://www.adafruit.com/products/1936</a></div>
</div>
</div>
To add aditional books to the page paste the code shown above before the
tag in the html file.
If you want to target a different file change the section
<a target="_top" href="issues/coloringbook_1-23-2014.pdf">
Files are placed in the issues folder.
For changing the image that shows you would change the line with
<img src="images/rforrobot.jpg" >
For images we named the folder images
You change either folder to any name, but just make sure the code is pointing to the right folder.
To change the description under the image we would edit this part of the code from earlier.
<div class="desc"><p>Ladyada's "E is for Electronics" is a coloring book adventure with electronic components and their inventors.</p>
<p>Makers of all ages can learn, color, and share common parts and historical figures throughout history. Explore the world of electronics with Ladyada as your guide!</p>
<a href="https://www.adafruit.com/products/1000" target="_blank">https://www.adafruit.com/products/1000</a></div>
-Transferring The Files
To get our html page and files to the Raspberry Pi we will be using WinSCP - Download WinSCP
Once WinSCP is installed we will open it up and put in raspberrypi.local for the Host name. You can also enter the username and password now or it will prompt you for that info later.
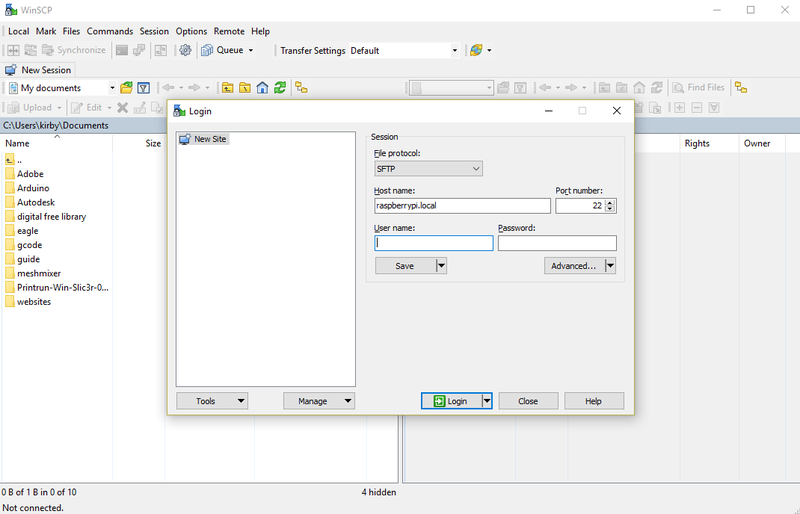
Now we will click Login.

Once we are connected and logged in we will be put in the /home/pi directory. The left side window is your pc and the right side window is the Raspberry Pi
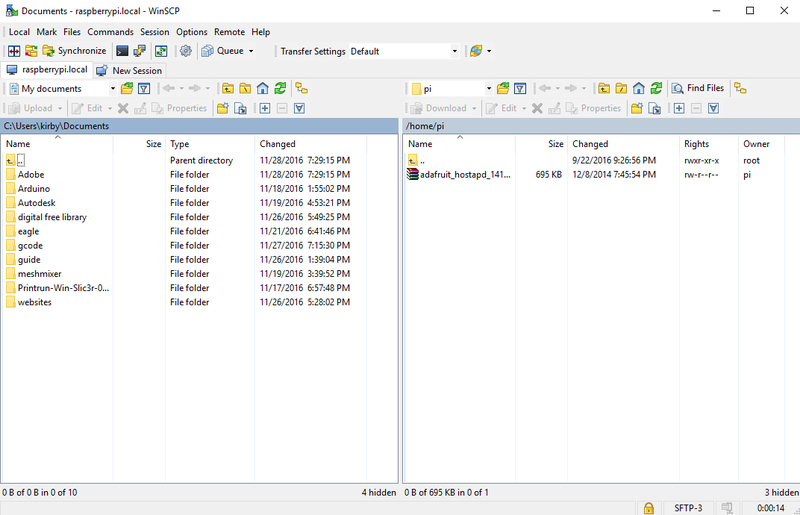
We need to go up two directories. So double-click on the folder with the up arrow twice.

Now we are in the root folder. We need to get to /var/www/html, Double-click on the folder labeled var, then double-click on the folder labeled www, and finally double click the folder labeled html

We first need to delete the index.html file currently there. Then drag the files downloaded previously to this directory.
 The library.local link works for most web browsers that I tested except Microsoft Edge. On the Edge browser you need to put in the IP adress. From an earlier step we set that to 192.168.42.1
________________________________________________________________________________
Thanks for reading, make sure to keep an eye on OkInteresting.com for more posts.
You can ask me questions here or @sanmansp on Twitter or fb.com/okinteresting
You can ask me questions here or @sanmansp on Twitter or fb.com/okinteresting
Comments
Post a Comment