If you want to learn how to set up Raspberry Pi Kodi (was XBMC) entertainment center solution with the right accessories and software, you’re in the right place.
Chapter 1: Parts You Will Need
In this chapter, you will learn which components you should choose for optimal performance based on my experience.
You’ll learn how to choose the right:
- Raspberry Pi 3 (recommended), Raspberry Pi Zero W.
- A MicroUSB power cable.
- An 8GB MicroSD card.
- Case to prevent overheating.
- Flirc IR receiver or the Flirc Raspberry Pi Case.
Get your kit :
/|\
If your television does not support HDMI CEC, then the most cost-efficient and working solution is the Flirc (get it here). Flirc learns any remote control, so you can use your old IR remote control and map it with the Flirc using a configuration application on Windows and Mac OS X.
You can follow this Flirc guide to map the keys with the configuration application. You can then plug the Flirc into Raspberry Pi and start controlling the Kodi.
Chapter 2: Build Your Raspberry Pi
- First, open the case and apply the thermal tape to the built-in heatsink. Then, insert the board inside the case.
- Insert the case cover back into place and tighten the screws.
- Insert the microSD card in the slot under the case. Please follow the instructions in the next chapter to install an operating system.
- Insert the HDMI, Ethernet and micro USB cables in place. Plug in the Flirc adapter, keyboard or any other controllers.
Chapter 3: Install Kodi on Raspberry Pi
I have tested the OpenELEC, OSMC, LibreELEC and XBian operating systems from a performance and stability point of view. They all use Kodi (XBMC) as an entertainment center, but the Linux distribution in the background is different.
From a pure performance point of view, there is no significant difference between LibreELEC, OpenELEC, XBian and the OSMC.
LibreELEC
LibreELEC is a just enough operating system for Kodi, which means that every additional operation has been taken away and the whole distribution has been optimized for Kodi use only.
LibreELEC is a fork of OpenELEC, so they are essentially the same. However, LibreELEC has bigger development team and gets updated more frequently.
While LibreELEC is a good option for many, you may sometimes prefer to have the full Linux operating system running in the background, so that you can add additional features such as home automation and media server capabilities.
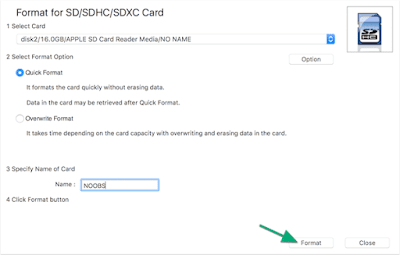
Here are the detailed instructions on how to format your microSD card:

- Download SD Formatter 4.0 for either Windows or Mac.
- Launch the SD Formatter installer and follow the installation instructions.
- Insert your microSD card into the computer’s SD card reader.
- Select the drive letter for your microSD card. Keep the “Quick Format” option and specify the name of the card.
- Click the “Format” button and soon you are done.
Install LibreELEC with USB-SD Creator
Note: You can use Raspberry Pi foundation’s easy operating system installer called NOOBS to install and get started with LibreELEC.
However, this method makes the system a bit slower to start up.
LibreELEC’s development team recommends to use their own USB-SD creator app for a dedicated Kodi setup.
Here are the detailed instructions how to install LibreELEC using their USB-SD Creator:
- Insert your microSD card into the computer’s SD card reader.
- Launch the Creator app with administrator rights.
- Make sure to select “Raspberry Pi 2 and 3” as version.
- Click “Download” and then select the folder where you wish to download the image file.
- Make sure your SD card drive has been selected correctly.
- Click “Write” and select “Yes” to confirm the operation.
- After writing is done, press the “Close” button and safely remove the card from your computer.
- Insert the card into your Raspberry Pi.
- Plug in the power cord to boot up RPi for the first time.
Let’s proceed with installing the LibreELEC operating system.
- Once RPi has booted, you will see the LibreELEC wizard. Press “Next”.
- If you wish, you can rename your host name. This is how your RPi will be shown to other devices in your home network.
- Select your Wi-Fi network. Press “Connect” and enter your Wireless Network Passphrase to connect to the Internet. Then, select “Next”.
- You can skip sharing and remote access, so just press “Next”.
Chapter 4: Add Media Content Sources
Install the codecs by following these steps:
- Purchase MPEG-2 and VC1 codec license keys.
- You will receive the license key via your email within 72 hours.
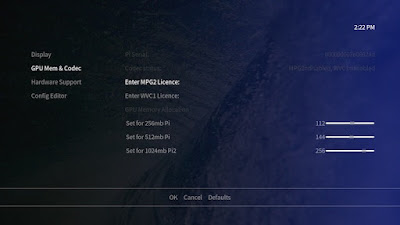
- In OSMC, go to My OSMC > Pi Config > GPU Mem & Codec.
- Enter the license key from your email to MPEG2 and/or WVC1 license under the Codec status.
- Reboot the system.
Here are the detailed instructions to add sources to video, music, and photo menus:
- In the videos tab on the home screen, select “Files”.
- Select “Add Videos” and “Browse” in the add video source.
- Browse to the folder where your media files are stored. If your files are located on a network attached storage, you will need to add the SMB or NFS share from the NAS server.
- Rename the media source, if needed, and select “OK”.
- In the set content window, you can set the type of media. Kodi will automatically scrape the movie, TV show, or music information after you have set up the media content.
- If your movies are located in separate folders, enable “Movies are in separate folders that match the movie title”.
- Confirm Yes in the “Change content” question.
- Now, you can go back to main menu where you will find a new “Movies” menu with your recently added movies.
If you wish to check for new media files on Kodi startup, go to Settings > Library settings > Databases and enable “Update library on startup”. You can also select “Hide progress of library updates” if you do not wish to see the progress indicator every time the library gets updated.


Comments
Post a Comment